> ## Documentation Index
> Fetch the complete documentation index at: https://docs.comify.io/llms.txt
> Use this file to discover all available pages before exploring further.
# Create an Email Template
> Build an email template in the Comify dashboard with the Drag & Drop editor or raw HTML, then publish it for use in campaigns and triggered communications.
Email templates are reusable messages you design once and reference by name everywhere Comify sends email — [campaigns](/campaigns/content) and triggered communications. This guide walks the **exact dashboard flow**, then explains **every block (node)** in the Drag & Drop editor and how to use it.
This is a dashboard walkthrough — no code required. Screens below are captured from **cloud.comify.io**.
## Open the Email Templates workspace
From the left sidebar, open **Template Manager → Manage Templates → Email**. This opens the **Email Templates** list.
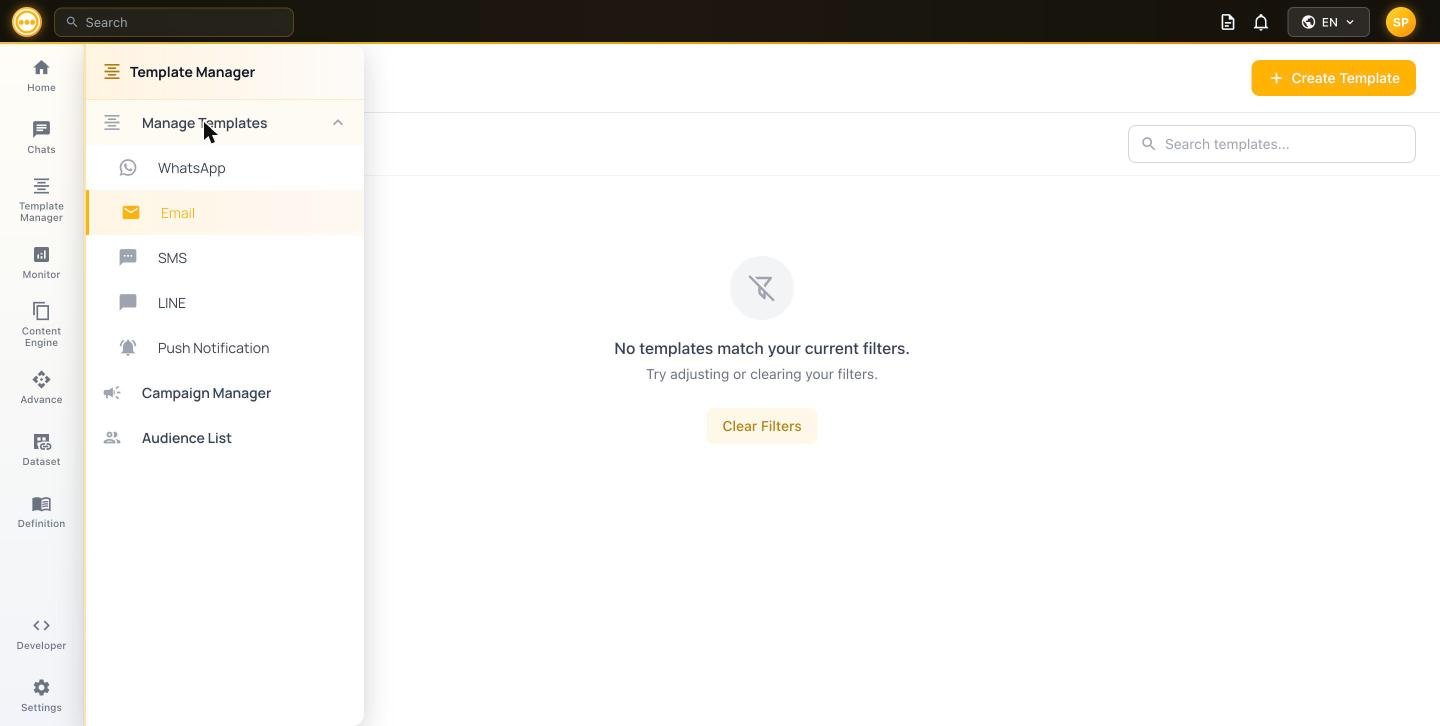 The list shows every template with a **Status** filter (**All**, **Draft**, **Live**), a search box, and the **Create Template** button. Only **Live** templates appear when you build a campaign.
 ## Create a template
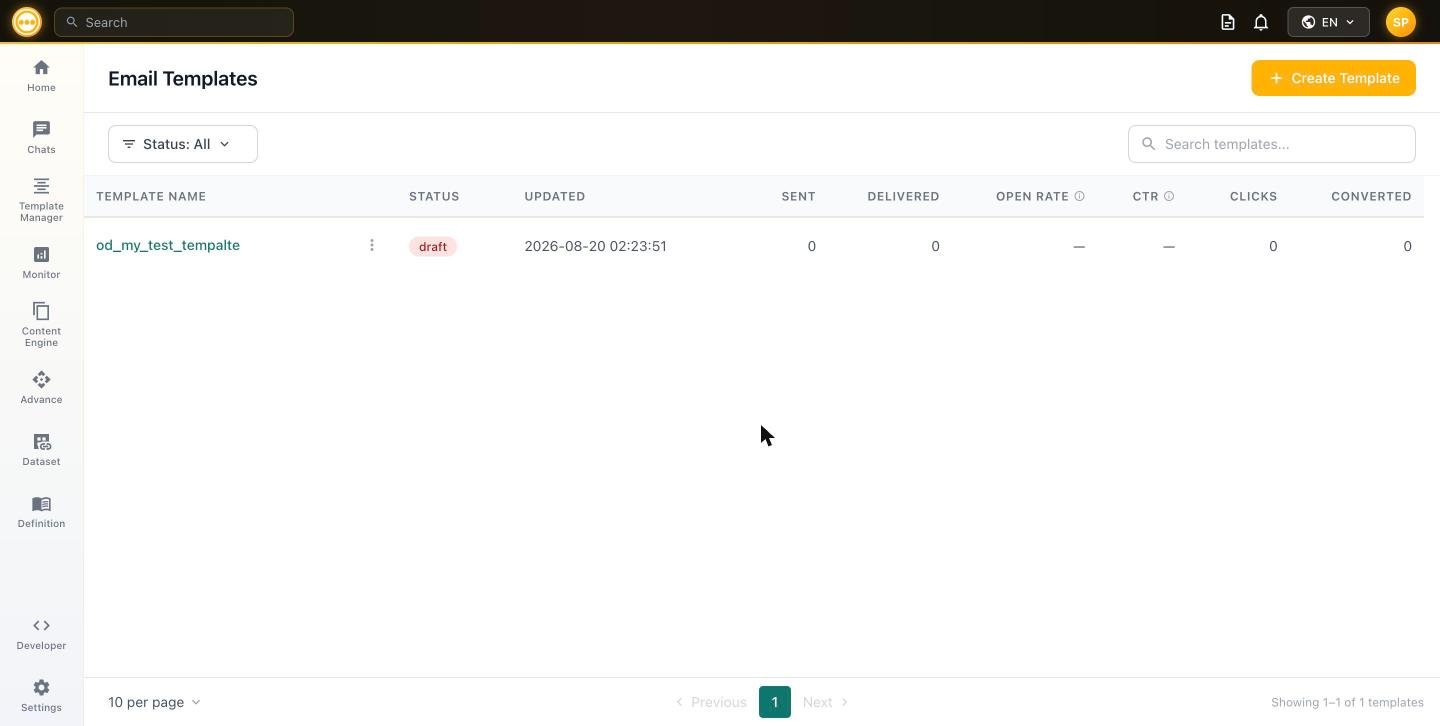
In the top-right of the Email Templates list, click **Create Template**. The **Create Email Template** dialog opens.
Enter a **Template Name** (e.g. `welcome_onboarding` or `order_confirmation`) — this is the identifier used in campaigns and triggers. Then pick **Create using**:
| Option | Use it when |
| --------------- | ----------------------------------------------------------------------- |
| **Drag & Drop** | You want a visual editor with blocks (recommended for most users). |
| **HTML** | You already have coded HTML to paste, or need full control over markup. |
## Create a template
In the top-right of the Email Templates list, click **Create Template**. The **Create Email Template** dialog opens.
Enter a **Template Name** (e.g. `welcome_onboarding` or `order_confirmation`) — this is the identifier used in campaigns and triggers. Then pick **Create using**:
| Option | Use it when |
| --------------- | ----------------------------------------------------------------------- |
| **Drag & Drop** | You want a visual editor with blocks (recommended for most users). |
| **HTML** | You already have coded HTML to paste, or need full control over markup. |
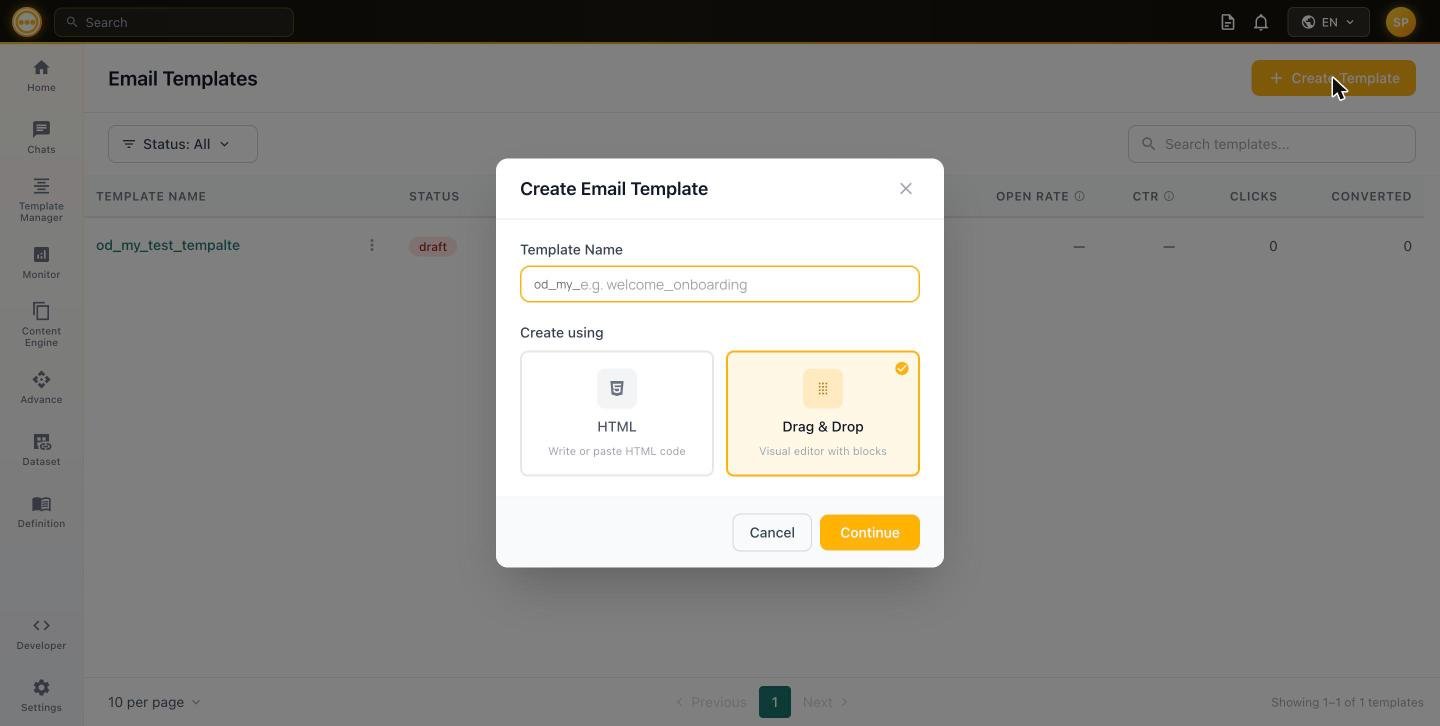 Click **Continue**. The editor opens in a new tab with the template in **Draft** status.
## The Drag & Drop editor
The editor has three regions: the **top bar** (actions), the **left panel** (Templates / Blocks / Sections), and the **canvas** where you drop blocks.
Click **Continue**. The editor opens in a new tab with the template in **Draft** status.
## The Drag & Drop editor
The editor has three regions: the **top bar** (actions), the **left panel** (Templates / Blocks / Sections), and the **canvas** where you drop blocks.
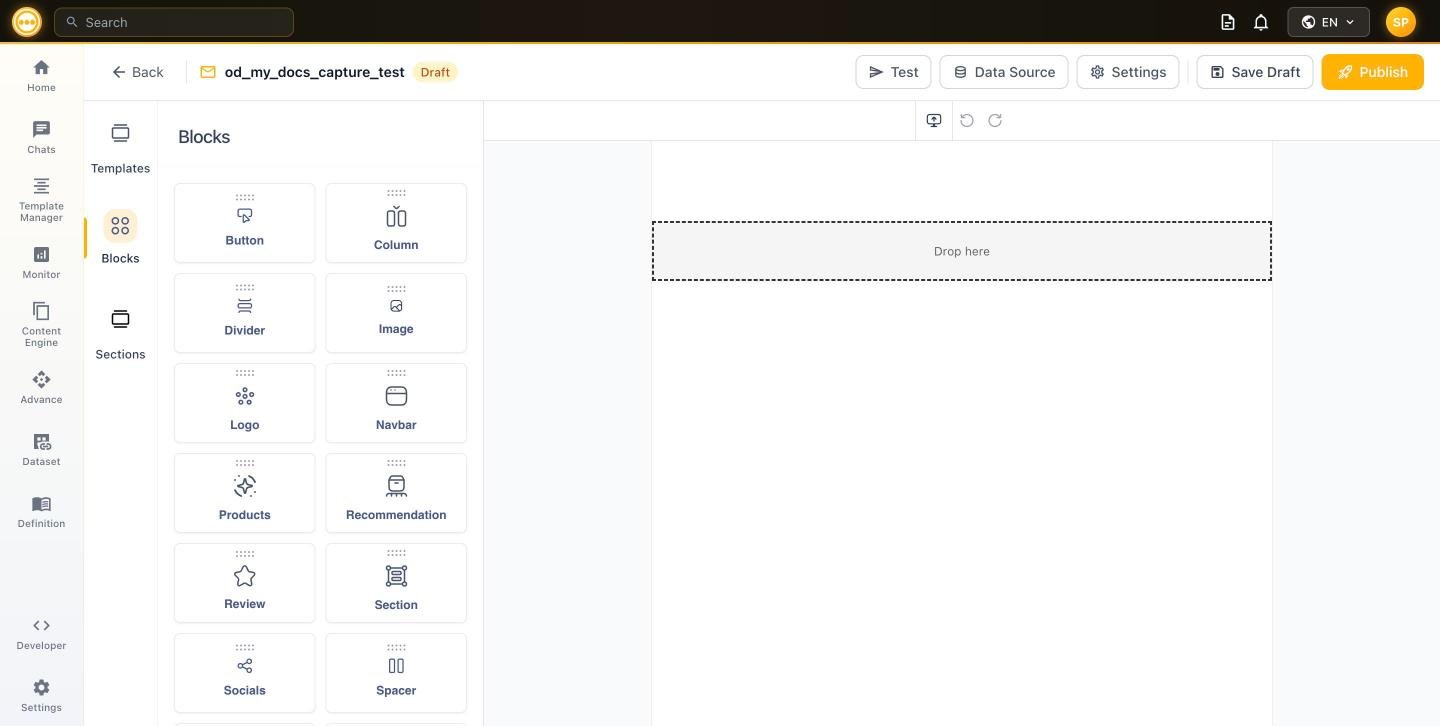 The top bar contains:
| Control | What it does |
| --------------------------- | ----------------------------------------------------------------------------------------------------------------- |
| **Back** | Returns to the Email Templates list. |
| **Draft / Unsaved Changes** | Status of the template. "Unsaved Changes" appears until you save. |
| **Test** | Sends a test email to your authenticated address (see [Send a test](#send-a-test)). |
| **Data Source** | Attaches a Payload so you can personalize with `{{variables}}` (see [Data Source](#data-source-personalization)). |
| **Settings** | Opens Template Settings — subject, sender, recipient, etc. (see [Template Settings](#template-settings)). |
| **Save Draft** | Saves your progress without publishing. |
| **Publish** | Makes the template **Live** so it can be used in campaigns. |
## Blocks (the building nodes)
Open the **Blocks** tab in the left panel to see every content block. **To use any block: drag it from the panel onto the canvas** (drop it on a **Drop here** zone). Once placed, select it to edit its content and styles.
The top bar contains:
| Control | What it does |
| --------------------------- | ----------------------------------------------------------------------------------------------------------------- |
| **Back** | Returns to the Email Templates list. |
| **Draft / Unsaved Changes** | Status of the template. "Unsaved Changes" appears until you save. |
| **Test** | Sends a test email to your authenticated address (see [Send a test](#send-a-test)). |
| **Data Source** | Attaches a Payload so you can personalize with `{{variables}}` (see [Data Source](#data-source-personalization)). |
| **Settings** | Opens Template Settings — subject, sender, recipient, etc. (see [Template Settings](#template-settings)). |
| **Save Draft** | Saves your progress without publishing. |
| **Publish** | Makes the template **Live** so it can be used in campaigns. |
## Blocks (the building nodes)
Open the **Blocks** tab in the left panel to see every content block. **To use any block: drag it from the panel onto the canvas** (drop it on a **Drop here** zone). Once placed, select it to edit its content and styles.
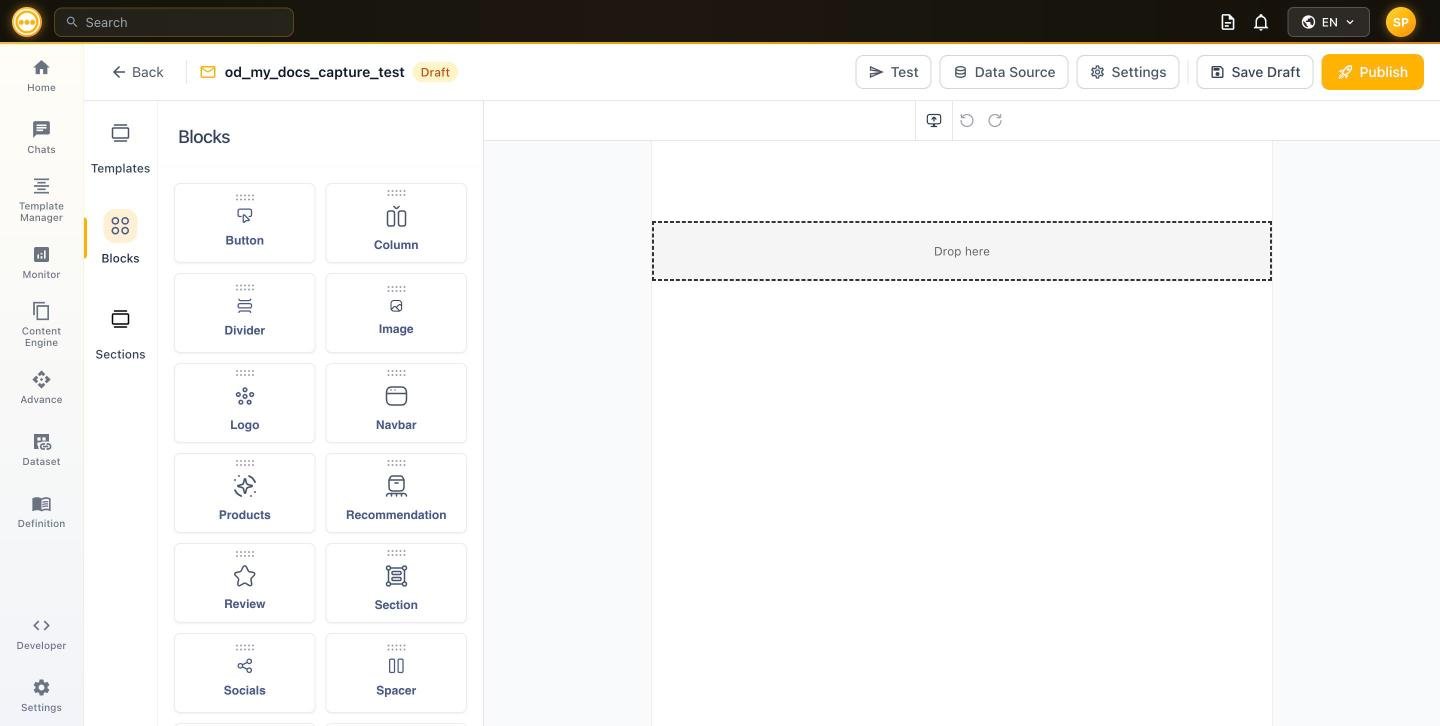 Here is every block and how to use it:
| Block | What it is | How to use it |
| ------------------ | ------------------------------------------------- | ----------------------------------------------------------------------------------------------------- |
| **Text** | A paragraph of rich text. | Drag in, type your copy, format with the toolbar, and insert `{{variables}}` via **Personalization**. |
| **Button** | A call-to-action button. | Set the label and destination **Link**; style the color, padding, and radius in the properties panel. |
| **Image** | A single image. | Add an image URL or upload; set alt text and a click-through link. |
| **Logo** | Your brand logo block. | Point it at your logo image; typically placed in the header. |
| **Navbar** | A row of navigation links. | Add link items (e.g. Home, Shop, Contact) and their URLs for a top menu. |
| **Divider** | A horizontal rule. | Drag between blocks to visually separate sections; adjust thickness/color. |
| **Spacer** | Vertical empty space. | Drag in to add breathing room; adjust its height. |
| **Section** | A full-width container that holds columns/blocks. | Use as a structural wrapper to group and background-style a band of content. |
| **Column** | A multi-column layout inside a section. | Drag in to place blocks side by side (e.g. image left, text right). |
| **Table** | A data table. | Use for structured rows such as order line items; edit rows and cells. |
| **Products** | Product cards pulled from your catalog/payload. | Bind to product data to show images, names, and prices automatically. |
| **Recommendation** | Personalized product recommendations. | Insert a recommendations block driven by your data for cross-sell/upsell. |
| **Review** | A customer review/rating block. | Display social-proof content such as star ratings and quotes. |
| **Socials** | A row of social media icons. | Add your social profile links (Instagram, LinkedIn, etc.). |
| **Video** | A video thumbnail that links out. | Add the video URL; email clients show a clickable poster image. |
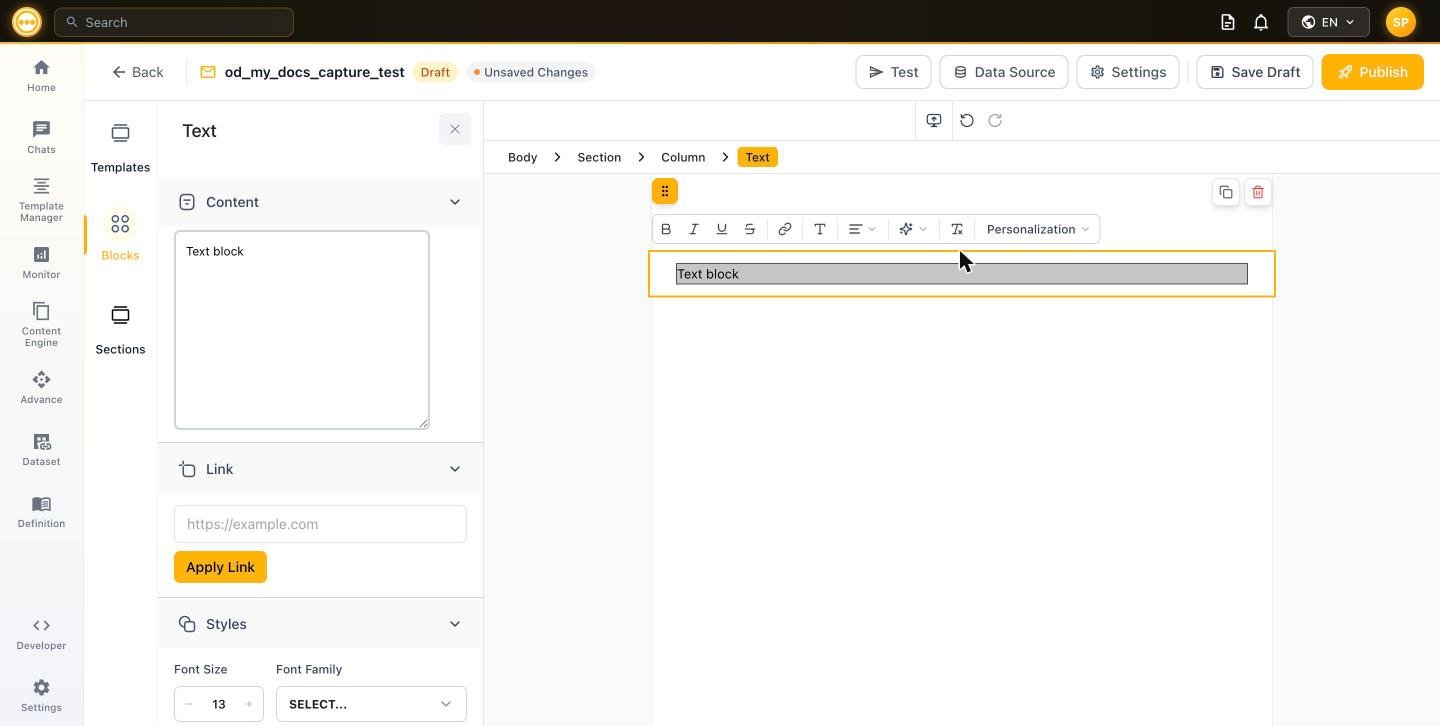
Blocks nest. When a block is selected, the breadcrumb at the top of the canvas shows its place in the structure — for example **Body › Section › Column › Text** — so you always know what you're editing.
### Editing a block
Select any block on the canvas to reveal its controls:
* A **floating toolbar** above the block: link, text formatting, alignment, AI assist, clear formatting, and **Personalization**. Icons to **duplicate** or **delete** the block sit on the right.
* The **left properties panel** with **Content**, **Link**, and **Styles** (font size, font family, colors, spacing, and more).
Here is every block and how to use it:
| Block | What it is | How to use it |
| ------------------ | ------------------------------------------------- | ----------------------------------------------------------------------------------------------------- |
| **Text** | A paragraph of rich text. | Drag in, type your copy, format with the toolbar, and insert `{{variables}}` via **Personalization**. |
| **Button** | A call-to-action button. | Set the label and destination **Link**; style the color, padding, and radius in the properties panel. |
| **Image** | A single image. | Add an image URL or upload; set alt text and a click-through link. |
| **Logo** | Your brand logo block. | Point it at your logo image; typically placed in the header. |
| **Navbar** | A row of navigation links. | Add link items (e.g. Home, Shop, Contact) and their URLs for a top menu. |
| **Divider** | A horizontal rule. | Drag between blocks to visually separate sections; adjust thickness/color. |
| **Spacer** | Vertical empty space. | Drag in to add breathing room; adjust its height. |
| **Section** | A full-width container that holds columns/blocks. | Use as a structural wrapper to group and background-style a band of content. |
| **Column** | A multi-column layout inside a section. | Drag in to place blocks side by side (e.g. image left, text right). |
| **Table** | A data table. | Use for structured rows such as order line items; edit rows and cells. |
| **Products** | Product cards pulled from your catalog/payload. | Bind to product data to show images, names, and prices automatically. |
| **Recommendation** | Personalized product recommendations. | Insert a recommendations block driven by your data for cross-sell/upsell. |
| **Review** | A customer review/rating block. | Display social-proof content such as star ratings and quotes. |
| **Socials** | A row of social media icons. | Add your social profile links (Instagram, LinkedIn, etc.). |
| **Video** | A video thumbnail that links out. | Add the video URL; email clients show a clickable poster image. |
Blocks nest. When a block is selected, the breadcrumb at the top of the canvas shows its place in the structure — for example **Body › Section › Column › Text** — so you always know what you're editing.
### Editing a block
Select any block on the canvas to reveal its controls:
* A **floating toolbar** above the block: link, text formatting, alignment, AI assist, clear formatting, and **Personalization**. Icons to **duplicate** or **delete** the block sit on the right.
* The **left properties panel** with **Content**, **Link**, and **Styles** (font size, font family, colors, spacing, and more).
 ### Templates and Sections
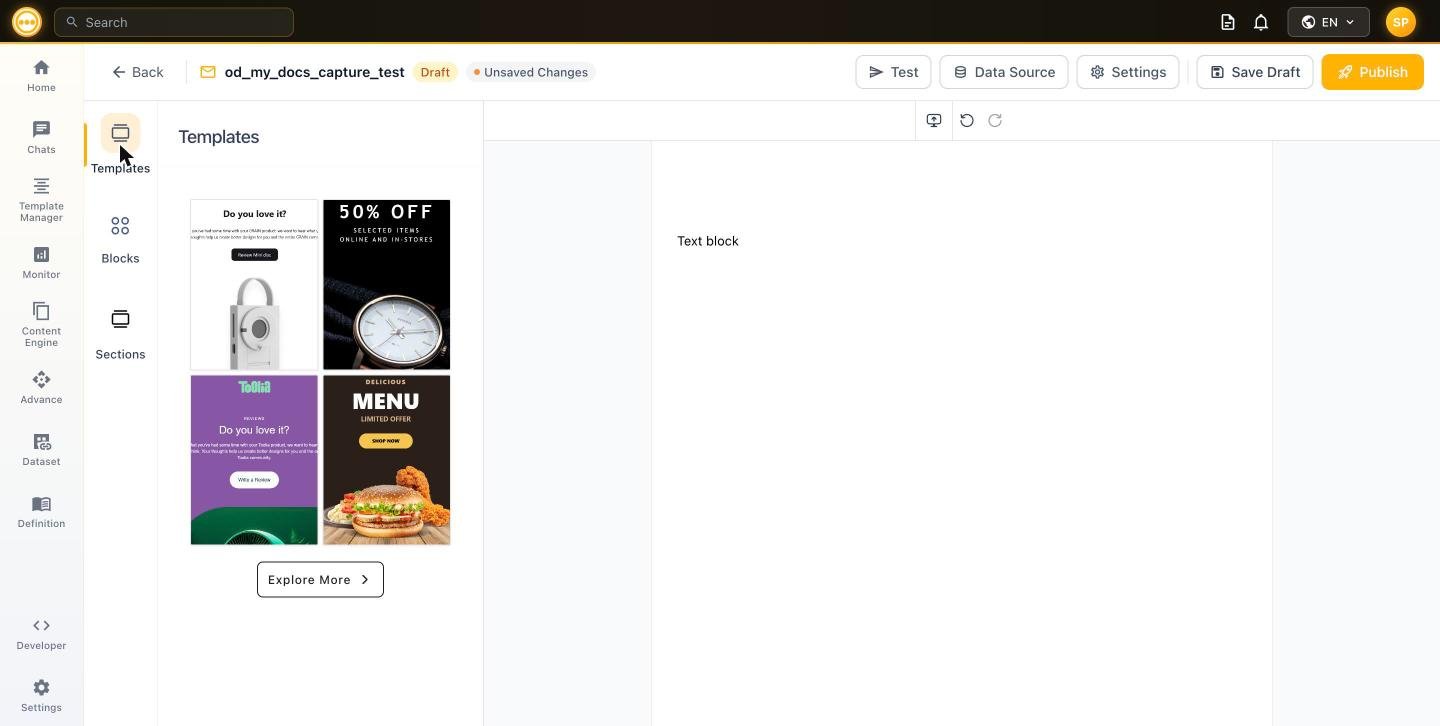
The left panel has two more tabs that speed up building:
* **Templates** — start from a prebuilt, fully designed email and customize it.
* **Sections** — drag in prebuilt multi-block sections, filterable by **Header**, **Footer**, and **Products**.
### Templates and Sections
The left panel has two more tabs that speed up building:
* **Templates** — start from a prebuilt, fully designed email and customize it.
* **Sections** — drag in prebuilt multi-block sections, filterable by **Header**, **Footer**, and **Products**.
 ## Data Source & personalization
To personalize content, first attach a **Data Source**. Click **Data Source** in the top bar and select a **Payload** — its fields become the tags you can insert.
## Data Source & personalization
To personalize content, first attach a **Data Source**. Click **Data Source** in the top bar and select a **Payload** — its fields become the tags you can insert.
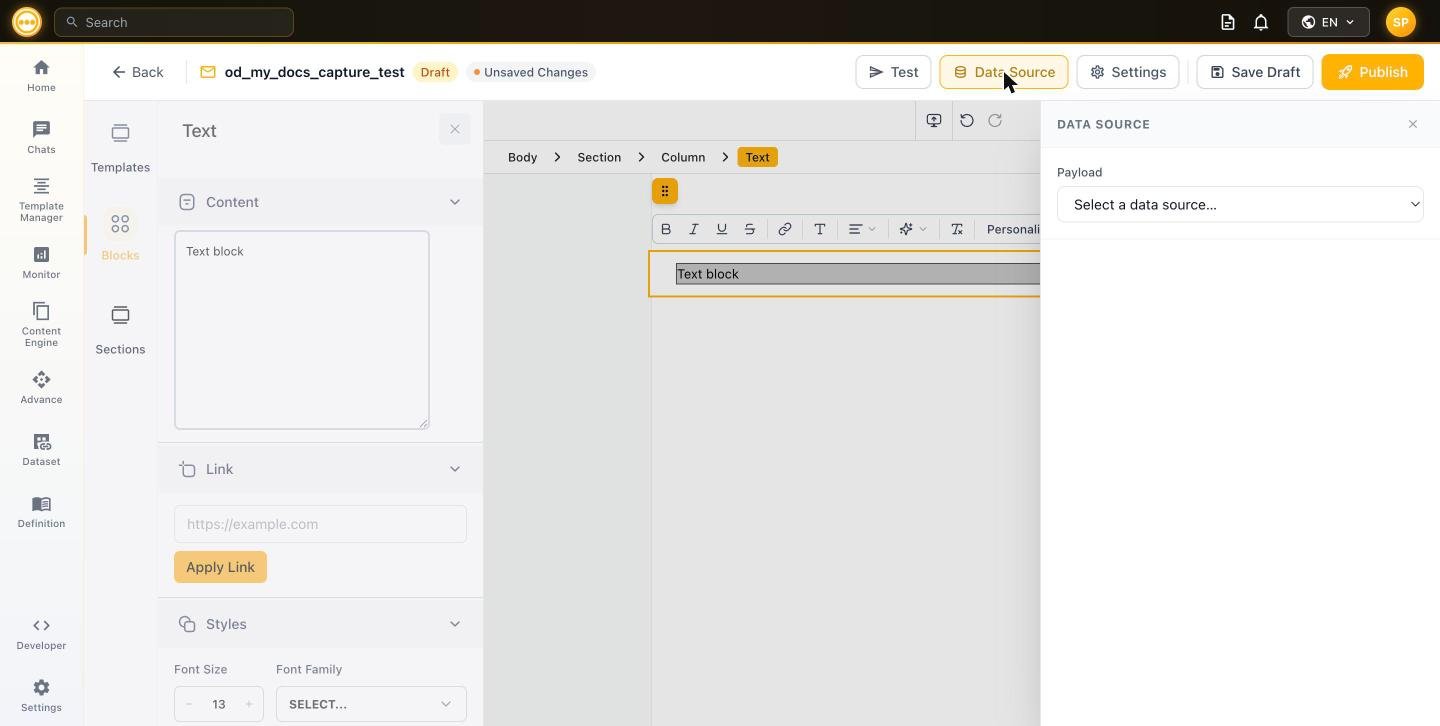 Then, inside any text-bearing block (or the Subject), open **Personalization** and pick a field to insert a `{{variable}}`:
```
Hi {{name}}, your order {{order_id}} is confirmed.
```
Then, inside any text-bearing block (or the Subject), open **Personalization** and pick a field to insert a `{{variable}}`:
```
Hi {{name}}, your order {{order_id}} is confirmed.
```
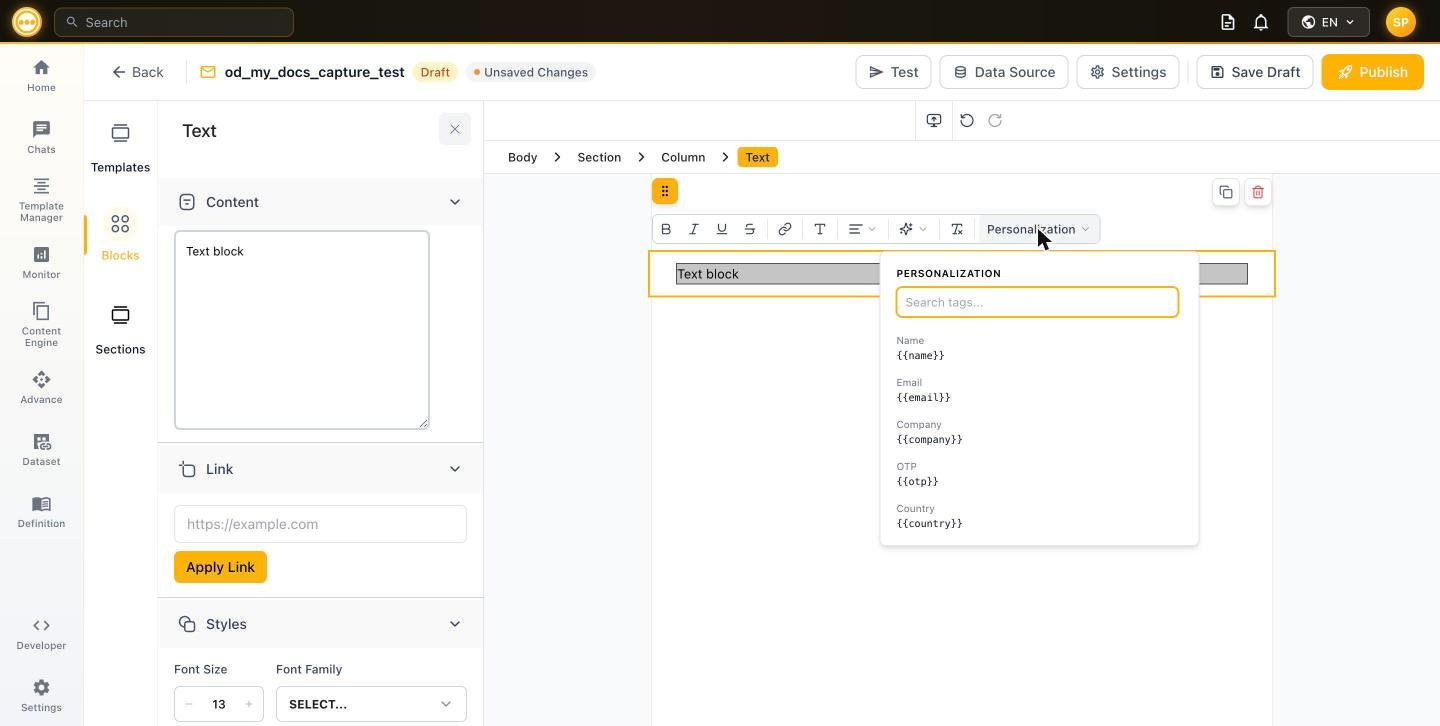 At send time, each variable is filled from the mapped audience column (in a [campaign](/campaigns/content)) or from the trigger payload.
## Template Settings
Click **Settings** in the top bar to open **Template Settings**. This is where the email's delivery details live.
At send time, each variable is filled from the mapped audience column (in a [campaign](/campaigns/content)) or from the trigger payload.
## Template Settings
Click **Settings** in the top bar to open **Template Settings**. This is where the email's delivery details live.
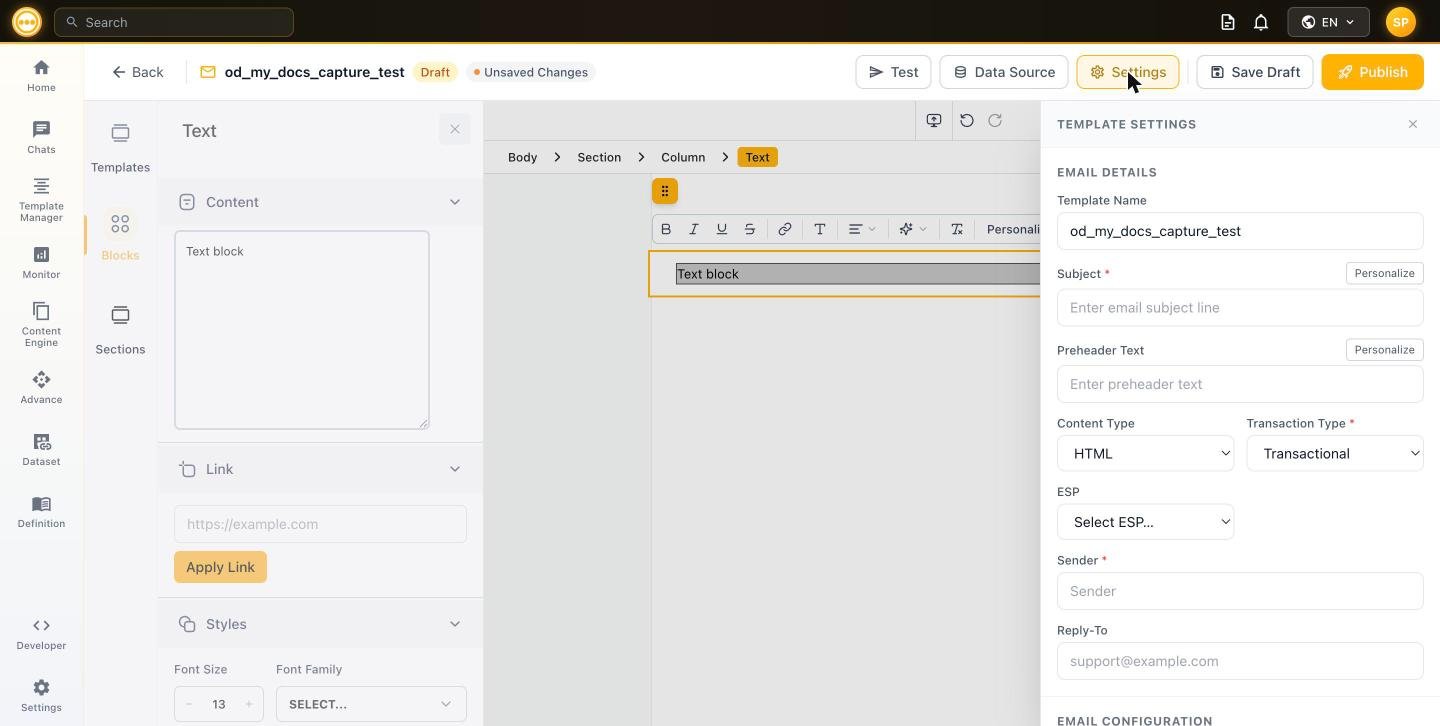 **Email Details**
| Field | Description |
| --------------------------------- | ------------------------------------------------------------------------------------------------------- |
| **Template Name** | The template's identifier. |
| **Subject** *(required)* | The subject line. Use **Personalize** to insert variables. |
| **Preheader Text** | The inbox preview snippet after the subject. Supports **Personalize**. |
| **Content Type** | **HTML** or **Text**. |
| **Transaction Type** *(required)* | **Transactional** or **Promotional** — classifies the email for deliverability and compliance purposes. |
| **ESP** | The email service provider used to send. |
| **Sender** *(required)* | The from address/name. |
| **Reply-To** | Where replies are routed. |
**Email Configuration** — bind these to fields from your selected payload:
| Field | Description |
| ---------------- | ------------------------------------------------ |
| **Recipient** | The payload field holding the recipient address. |
| **CC** / **BCC** | Optional carbon-copy fields. |
| **Attachments** | Optional payload field for file attachments. |
## Send a test
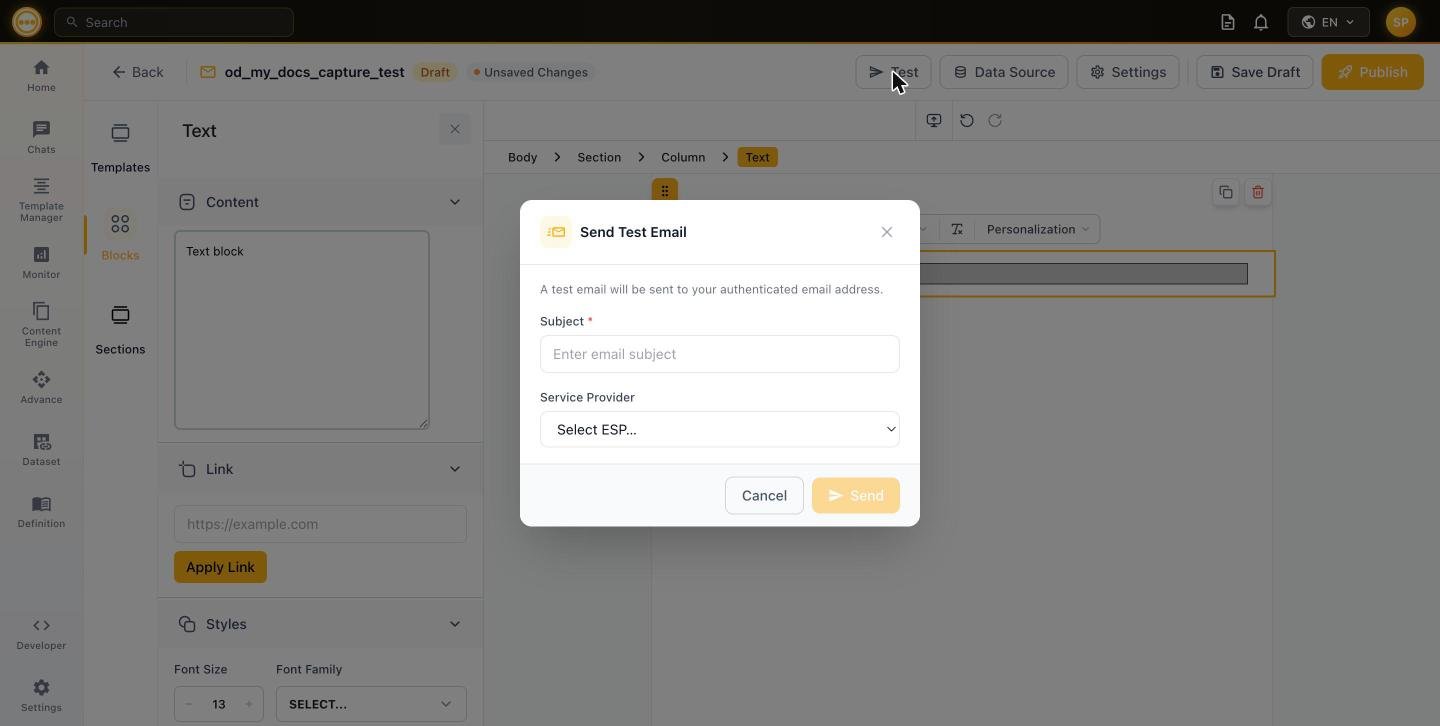
Click **Test** in the top bar. In the **Send Test Email** dialog, enter a **Subject** and choose a **Service Provider**, then **Send**. The test goes to your authenticated email address so you can verify rendering.
**Email Details**
| Field | Description |
| --------------------------------- | ------------------------------------------------------------------------------------------------------- |
| **Template Name** | The template's identifier. |
| **Subject** *(required)* | The subject line. Use **Personalize** to insert variables. |
| **Preheader Text** | The inbox preview snippet after the subject. Supports **Personalize**. |
| **Content Type** | **HTML** or **Text**. |
| **Transaction Type** *(required)* | **Transactional** or **Promotional** — classifies the email for deliverability and compliance purposes. |
| **ESP** | The email service provider used to send. |
| **Sender** *(required)* | The from address/name. |
| **Reply-To** | Where replies are routed. |
**Email Configuration** — bind these to fields from your selected payload:
| Field | Description |
| ---------------- | ------------------------------------------------ |
| **Recipient** | The payload field holding the recipient address. |
| **CC** / **BCC** | Optional carbon-copy fields. |
| **Attachments** | Optional payload field for file attachments. |
## Send a test
Click **Test** in the top bar. In the **Send Test Email** dialog, enter a **Subject** and choose a **Service Provider**, then **Send**. The test goes to your authenticated email address so you can verify rendering.
 ## Save or publish
* **Save Draft** keeps your work in progress (status stays **Draft**).
* **Publish** makes the template **Live**.
Only **Live** templates appear in the campaign template picker. If a template isn't selectable in a campaign, confirm it's **Published**, not saved as a Draft.
## Next steps
* Send it as a broadcast: [Create an email campaign](/campaigns/overview)
* Other channels: [WhatsApp template](/platform/create_whatsapp_template) · [Push template](/platform/create_push_template)
## Save or publish
* **Save Draft** keeps your work in progress (status stays **Draft**).
* **Publish** makes the template **Live**.
Only **Live** templates appear in the campaign template picker. If a template isn't selectable in a campaign, confirm it's **Published**, not saved as a Draft.
## Next steps
* Send it as a broadcast: [Create an email campaign](/campaigns/overview)
* Other channels: [WhatsApp template](/platform/create_whatsapp_template) · [Push template](/platform/create_push_template)